Saturday, June 21, 2014

Go Fish!!


My latest challenge has been to create mixed media funky fish.  I have created a few of these.  Some turn out better than others.  It has been fun and it is a challenge to come up with new ideas.

These fish are created using a template that was provided by the person that started the art swap on ATCs for All.  It is roughly 3.5 inches tall and 8 inches long.  The basic shape could be anything from a guppy to an angel fish depending on the embellishments.  I have been using pieces of cereal box as the base.  From there, the techniques vary.

These are my creations so far.  Enjoy!

Going with the flow is my newest.  You can barely read the saying on top but that was on purpose.
I wanted it to blend in with the dots and sort of act like the lateral line on the fish body.  After all, the quote is about conformity :-).

I don't usually do cute but she just evolved.  Her fins are made from crinkled tissue paper and lots of glitter glue. Her "scales" are made using a chevron stamp and silver ink over a painted background. Her glossy eye is made from Glossy Accent over black and white circles.  Her eyelashes are embroidery thread.

This fish started out with a layer of tissue paper.  The fish on top are hand drawn.  The medium sized one is painted.  The smallest is a hand cut fish coated with a layer of gold embossing powder.


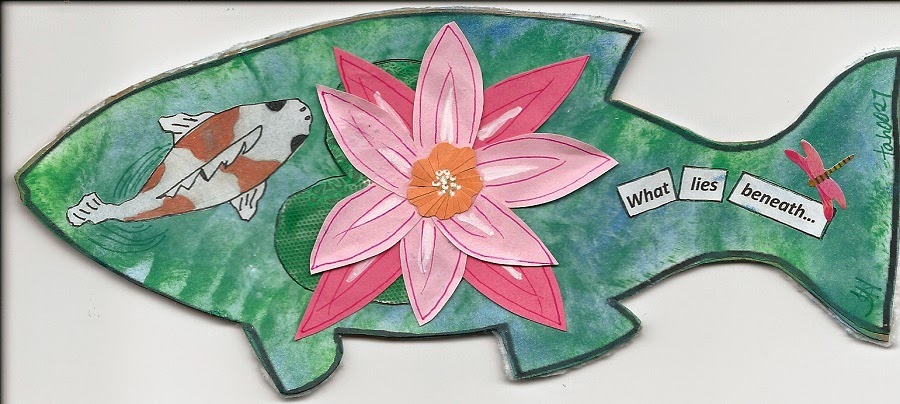
The fish below is actually one fish.  The front is a view from above with the caption, "What lies beneath..."  The white and orange fish is an up close of what lies beneath.  This side is highly textured using gesso and a layer of used dryer sheet under all the paint.  The orange is embossing powder and the raised lines on the fins are drawn with puff paint.  


Sunday, September 29, 2013

You have my Heart

Recently, I joined a challenge to create mixed media hearts.  I decided to use cereal boxes as my base.  I cut 4 x 4 hearts from the box sides and then used gesso on the colored side of the box paper.  This did three things, it covered the cereal box color, it gave me a base paint would stick to, and it gave the hearts a little bit of texture.  This was a good start.  Next, I used paint to create the first layer of color.  After that, the technique on each heart changed.

The Abundant Blessings heart was started with a coating of modeling paste over the gesso layer.  This was painted with a coat of harvest gold acrylic paint then stamped with French script.  The edges were highlighted with gold paint.  The flowers were pre-made from a package.


The flower on the Forever heart was made with modeling paste and a stencil.  It was coated with off white acrylic paint and highlighted with distress ink.  The background was created using book pages over a thick gesso.  This was coated with acrylic paints and metallic ink.

For the Golden Flight Dragonfly, the dragon fly was created using a stencil and modeling paste.  Lots of additional colors were added and the dragonfly was painted using gold acrylic paint.


The unfinished heart with no words was created with a very thick layer of gesso to give it texture.  The next layer is acrylic paint in wine and red tones applied using a paper towel dipped in both colors.  The next layer is silver acrylic applied using a dry brush.  Lastly, the edges were dotted with black ink.  The flower on this one is hand made.  I used a punch with a ruffle edge and cut 5 pieces.  One piece was a dotted black and white paper.  The others were off white card stock that was stamped with French script.  I punch a hole in all layers and put them together with a black brad.  I then cut into the shapes and created "petals" and used a scissor edge to curl the petals.  The flower was attached using the brad through the heart itself.  This heart isn't finished because the words for it have not come to mind.

Finally, the last heart was made using the same template with an additional 2 layers.  The first layer was the card board heart.  The second was a layer of aluminum foil.  The third was a layer of scrapbook paper.  I carefully cut through top 2 layers and folded them back.  That's where the fun started.  I painted, stamped, inked...  When I was done, it still looked a little plain so I added a wrapped edge of tissue paper then coated the whole edge thing with one more coat of white paint.  The word is made of chipboard letters covered with paper and edged with blue ink.  Finally, it was all attached together with handmade springs.  I made the springs using thick jewelry wire.  
 

Friday, July 19, 2013

Watercolor ATCs

These are a few examples of watercolor ATCs I've completed.


Oregon Coast
Autumn Leaves
Inspired by a painting I saw in a gallery...

Collage using magazine scraps


I recycle several magazines each month.  One of the ATC swaps I signed up for was using magazine scraps to make cards.  These are a few examples of the results.