Friday, April 1, 2016

Emulate - Journal 52

The prompt for week 12 was to emulate or copy one of your favorite artists.
I picked Alfred Gockel.  I like his abstract work and his overall style.  I tried to copy one of his works and I came close.  It isn't exact.  My moon and highlighting aren't as delicate.  My colors are bolder and I think my figure has more presence.
Gockel's original is on the left and my "copy" is on the right.

Saturday, March 5, 2016

Nerdy Kind of Love - Journal 52 prompt

I know I haven't posted in a while but I wanted to share this painting I just completed.  It is in my art journal.  I'm exceptionally proud of it because it is my first larger piece that I drew and painted all on my own. I didn't use stamps or premade pictures. The background is acrylics with spray inks on top. I splattered white as the last step.  The TARDIS is hand drawn and painted using acrylics.  All outlines and writing were done using paint pens.  The sign is a piece of paper cut to fit the square and finished with my own hand writing.

It is a nerdy kind of love because it is one of the favorite pastimes of my spouse and I.  We have found and watched every episode of Dr. Who from the first one in 1963.  Some were easy to find but others were not.  The episodes range from full film episodes to simply still photos aligned with the existing sound tracks.  There was at least one episode that was remade as a cartoon using the soundtrack because there were so few actual pictures.
Apparently, the BBC didn't know that Dr. Who would become a world wide favorite and last so many years.  As a result, they recorded over many of the original film reels to make new episodes. Others were ruined in a flood. Thankfully, there is a project to make the still photo slideshows using the audio.  Most of this work is being done by die-hard fans.


Friday, November 21, 2014

Holiday ATCs

I haven't posted in a while because I've been busy traveling for work.  It is hard to make art while in hotels.  For this "Merry Christmas" atc swap, I decided to use just the supplies I could pack into a gallon size zip top bag in my checked luggage.  I stamped some random snowman images and text onto card stock before I left home.  I took some holiday themed papers and ended up cutting up magazine pages to get colored paper for the tree and stable.  All other elements are hand drawn.  Ink pens, color pencils and watercolors were used to color the images and to paint the backgrounds.  Some of the elements were completed using Glossy Accents and glitter glue.  The finished card had to be backed with another piece of card stock because the watercolor made them flimsy.


Friday, September 5, 2014

Alfred Gockel

Recently, I hosted an ATC swap of cards inspired by the atrist, Aflred Gockel. The returns were varied and focused on many aspects of his art.  These are my own contributions.  They are all hand painted in acrylics on heavy paper. Remember that ATCs are 2.5x3.5 inches so I think they came out really nicely.


 All of these are titled "Nature" and numbered.

Wednesday, September 3, 2014

Just a few more..

I've made another heart and fish to exchange.  I think they came out pretty well so I wanted to share.

This heart was painted using crackle medium.  The bottom heart has washi tape and a painted black edge.  The top heart has an edge made of black embossing powder.  The key is a wooden key painted gold.


This fish started out as cereal box that was covered with torn book pages.  I stamped over the top using an Inkadinkado stamp and clear embossing powder. I used stamping inks from Studio G to created the greenish purple background and the clear embossing powder acted as a resist.  Next, I used blue and brown inks and stamps of tree tops and clocks.  Finally, I drew a seagull and cut out a stencil to use for the bird.  The quote from Martin Luther Kings, Jr was printed and colored using spray ink.  Accents were added using gel pens. 

Thursday, August 28, 2014

Funny Little Owls

This week I worked on a challenge to create an owl from a toilet paper tube.  It was fun to watch the videos online and to see just how many ways there are to approach this project.  These little owls were the result.

Mainly, I used scrap paper to cover the cardboard and for the pieces.  Some of the papers were the inside of old envelopes.  Other pieces were from the fronts of old greeting cards.  For any of the plain paper, I either stamped images or just added dots with markers.  The eyes were made from circle and flower punches

Thanks for visiting.

Wednesday, August 20, 2014

Sky, Sand and Seagulls

I recently joined a new art swap group.  One of the first swaps I signed up for was to complete 2 ATCs with the theme of sky, sand and seagulls.  I finished my cards and thought I would share.

This is a happy little gull based on a photograph I took when visiting the Oregon Coast.  The seagulls often sit on the fence near the picnic area waiting for people to feed them.  
The card was created on 140 lb watercolor paper.  The sky, and sea were painted using watercolor paints.  The sand is Martha Stewart Texture Paste that feels and looks like sand.  I drew the fence on brown craft paper and then added texture by stamping with the stamp pad over the whole thing.  The shadows were added using a brown marker.  I cut it out and attached it to the card.  I drew in the grasses behind it to add interest.  I wished I had drawn them first but I didn't think of it until it was too late :-).  Next I drew the seagull on card stock, colored it and cut it out.  It is adhered to the card using pop dots.  The card was very heavy so I adhered it to a piece of cereal box.

This card was also inspired by a photograph I took at the beach. This card is heavy card stock.  I started by creating the sky using a technique I saw on YouTube.  I tore a paper towel and used blue stamp ink from Studio G to color the edges.  As I moved down the card, I turned the paper towel slightly and continued until I had enough sky.  I liked how the sky turned out so I decided to try the same strategy for the sand.  I tore a second piece of paper towel but slanted it .  The ink is Vintage from Colorbox Mixed Media.  Again, I just flipped the whole container over and used it like a sponge.  I liked how the edge of the ink pad made slight variations in the sand.  I used an olive green ink and a floral stamp from Studio G for the grasses.  I drew, colored and cut out the seagull.  It is attached using foam tape. This bird looks a little more serious.

These were fun to make and as summer comes to an end, it was nice to revisit the trips to the coast.

Thursday, July 31, 2014

The Birds

The challenge for the second swap was to create Twinchies with birds on them. Twinchies are 2 inch squares that become the canvas for the art.  One might think this is small so it should be easy but when I began to try to fill 4 square inches with art that was small enough and made sense, they seemed like a lot of white space.  I've made inchies (1 inch squares) and they didn't seems as hard as Twinchies.  Let's take a look at what I came up with....

OK, for the first card I was inspired by a tag that I saw on Pinterest.  The tag used products by Tim Holtz.   I didn't use those products on my Twinchie but I did take the basic idea for the meadow and the mosaic.
First I punched a 2 inch square.  I covered this square with torn dictionary pages and Modge Podge.  While that dried, I cut a second square at 1 3/4 inches.  Using ink pads from Studio G, I colored in a grassy area and sky.  I usually just turn the pad over and use it straight from the container.  The grass was made with light green up to the middle of the card and the sky using light blue down to about the middle.  I then took a darker blue and a darker green and went back over those areas stopping short of the middle.  That gives the center a lighter look.  Next I stamped flower images using Stampin' Up stamps and Staz On brown ink.  I also stamped circles on the sky area using light green ink. Once the 2 inch square was dry, I coated it with Ranger Distress Ink in walnut using a cotton ball.  While that dried, I cut the smaller square into 16 small squares.  I reassembled the scene on top of the 2 inch square.  The bird is from a Momenta stamp on card stock that I had inked with the distress ink.  To give it a raised look that wasn't too high, I put the bird on a piece of cereal box that I doubled in thickness by gluing 2 pieces together and cut it out with my Exacto knife.  It is attached with glue on top of everything.

This Twinchie was much simpler.  I punched the square from a sheet of 140 lb water color paper and covered the paper with gesso.  The moon and sky were painted using blue and white acrylic paints.  I needed a large swirl.  To get this to work, I had to tape the small card to my craft mat using painters tape on the back. I painted it using a large circle that went off the small card.  Next, I painted the swirly tree and bird silhouettes with black acrylic paint. The edges weren't very crisp since my smallest paint brush was still too thick so I went around the edges of the birds with a black gel pen.
For this Twinchie, I punched  the 2 inch square from a piece of thick white cardboard from a package of gel pens.  I always save these thick pieces of packaging because they make great bases for ATCs.  All of the inks I used on this card were from Studio G.  I stamped light blue swirls on the white card using an Inkadinkado stamp.  I antiqued the card using Ranger Distress Ink in tea stain using a cotton ball.  I then stamped the cage using black ink and the key using gold ink. Those stamps were from a bag I got at a yard sale.  Next, I stamped music on the white cardboard and used a chip board bird from Studio G as the template.  I cut out the bird, inked the edges, and attached it to the top then traced around it using white Souffle gel pen.  The little silver hearts were confetti I got in a card for Valentine's day.

  The last little birdie was started using a 2 inch square punched from a cereal box. I covered the square with gesso.  Once the gesso was dry, I used a light blue ink pad and lightly coated the gesso. Next, I stamped a variety of swirls and flowers using dark green and olive green inks.  I free hand cut out the bird shape from patterned paper and cut the wing from a scrap of dictionary page that was colored by pressing it down on blue and pink ink pads.  Once the ink was dry, I attached the bird and coated the whole thing with matte Modge Podge to seal it.  Last, I went around the bird and the edge of the card with brown marker and used white gel pen to add accents.


For the Birds

Over the past couple of weeks, I've joined 2 art swaps that revolved around birds.  The first was a Birdhouse ATC swap but the catch was that the ATC had to be in the shape of a birdhouse and still fit the overall size of an ATC (2.5 x 3.5 inches).  The swap was open to any medium so my techniques ranged from hand painting to stamping to collage.  

For the birdhouses, I started by cutting out a template to use but after creating the first house, I decided that it would make me happier to change each one.  As a result, each house is shaped just a little differently.  Each house started with a chipboard ATC and was then cut into the shape it became.  So let's take a look at them and I'll tell you how it was made.

 For the first house, I cut the shape then painted it with a coat of light blue watercolor paint.  Next, I covered parts of the shape with patterned paper.  I wish I knew where I got these papers but I have had them far too long and they weren't marked.  The trim was cut from a part of a pink VooDoo Doughnut box. The flowers were punched and the centers were inked with metallic gel pens.  The little birds were stamped on patterned paper then cut out.  Finally, the words were printed using a text box with a patterned background.


For the second house, I cut out the shape then covered it with green and yellow polka dot paper.  The chimney was also covered in the polka dot paper.  I used a scrap of different patterned paper for the base.  The roof was cut from the inside of an envelope. The flower was punched and inked.  The tiny bird was stamped and cut out then the reverse side was painted and accents were drawn on using gel pens.  The fence was free hand drawn "boards" cut out and glued together. All accents, including the roof shingles and chimney were added using gel pens.  The music notes were stamped.
 This house turned out very different than the first two.  The shape was cut and covered with plain white cardstock.  The light blue swirls were stamped using Stampin' Up stamps.  I added the light blue circle as an opening.  Once those were dry, I coated the whole thing with Delta Ceramcoat Pearl Finish paint.  Next, I covered the base of the house with Studio G glitter Glue and added the white trim using Scribbles 3D paint.  I punched fleur de lis from paper coated with the Pearl Finish.  I added the lace and accented it with Scribbles 3D paint "pearls" then attached the fleur de lis.  Finally, I made paper roses from punched flowers.  Each rose took 3 flowers that were cut and glued into this shape.  I got the idea from a video on YouTube.  I don't have a 6 petal punch so I had to improvise using my 5 petal flower.

This picture is hard to see because the roof is white and I didn't think to scan it with something over the back.  The last house was cut out without a base.  The house is painted with a coat of acrylic paint and then the black circle was added.  I punched scalloped circles and cut them in half to use as the scalloped roof line.  Before adding them to the house, I coated each one with Liquitex Light Modeling Paste to give it some texture.  I applied it using my fingers so there are ridges and peaks in the texture.  Finally, I punched flowers and free hand cut out leaves and vines.  I attached these but it still felt bare.  I decided to add the yellow butterfly that was left over from a different project.  I stamped tiny circles in light green then coated the whole butterfly with Perfect Pearls medium and powder.The trim, dots, and flower centers were made using Scribbles 3D paint.


Saturday, June 21, 2014

Go Fish!!


My latest challenge has been to create mixed media funky fish.  I have created a few of these.  Some turn out better than others.  It has been fun and it is a challenge to come up with new ideas.

These fish are created using a template that was provided by the person that started the art swap on ATCs for All.  It is roughly 3.5 inches tall and 8 inches long.  The basic shape could be anything from a guppy to an angel fish depending on the embellishments.  I have been using pieces of cereal box as the base.  From there, the techniques vary.

These are my creations so far.  Enjoy!

Going with the flow is my newest.  You can barely read the saying on top but that was on purpose.
I wanted it to blend in with the dots and sort of act like the lateral line on the fish body.  After all, the quote is about conformity :-).

I don't usually do cute but she just evolved.  Her fins are made from crinkled tissue paper and lots of glitter glue. Her "scales" are made using a chevron stamp and silver ink over a painted background. Her glossy eye is made from Glossy Accent over black and white circles.  Her eyelashes are embroidery thread.

This fish started out with a layer of tissue paper.  The fish on top are hand drawn.  The medium sized one is painted.  The smallest is a hand cut fish coated with a layer of gold embossing powder.


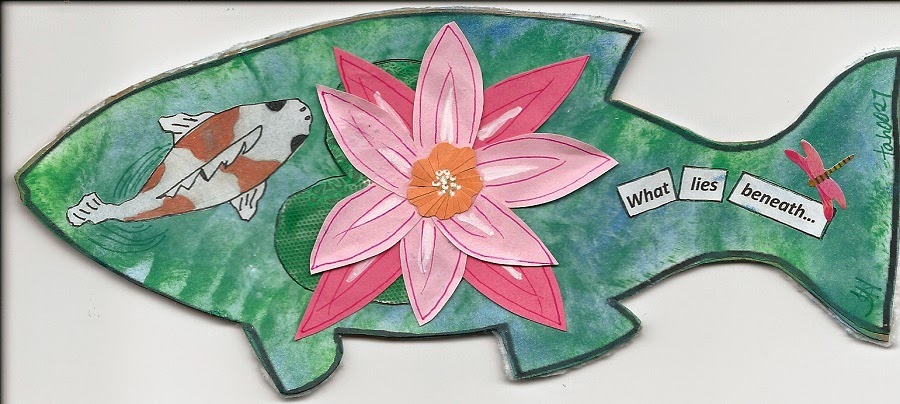
The fish below is actually one fish.  The front is a view from above with the caption, "What lies beneath..."  The white and orange fish is an up close of what lies beneath.  This side is highly textured using gesso and a layer of used dryer sheet under all the paint.  The orange is embossing powder and the raised lines on the fins are drawn with puff paint.  


Sunday, September 29, 2013

You have my Heart

Recently, I joined a challenge to create mixed media hearts.  I decided to use cereal boxes as my base.  I cut 4 x 4 hearts from the box sides and then used gesso on the colored side of the box paper.  This did three things, it covered the cereal box color, it gave me a base paint would stick to, and it gave the hearts a little bit of texture.  This was a good start.  Next, I used paint to create the first layer of color.  After that, the technique on each heart changed.

The Abundant Blessings heart was started with a coating of modeling paste over the gesso layer.  This was painted with a coat of harvest gold acrylic paint then stamped with French script.  The edges were highlighted with gold paint.  The flowers were pre-made from a package.


The flower on the Forever heart was made with modeling paste and a stencil.  It was coated with off white acrylic paint and highlighted with distress ink.  The background was created using book pages over a thick gesso.  This was coated with acrylic paints and metallic ink.

For the Golden Flight Dragonfly, the dragon fly was created using a stencil and modeling paste.  Lots of additional colors were added and the dragonfly was painted using gold acrylic paint.


The unfinished heart with no words was created with a very thick layer of gesso to give it texture.  The next layer is acrylic paint in wine and red tones applied using a paper towel dipped in both colors.  The next layer is silver acrylic applied using a dry brush.  Lastly, the edges were dotted with black ink.  The flower on this one is hand made.  I used a punch with a ruffle edge and cut 5 pieces.  One piece was a dotted black and white paper.  The others were off white card stock that was stamped with French script.  I punch a hole in all layers and put them together with a black brad.  I then cut into the shapes and created "petals" and used a scissor edge to curl the petals.  The flower was attached using the brad through the heart itself.  This heart isn't finished because the words for it have not come to mind.

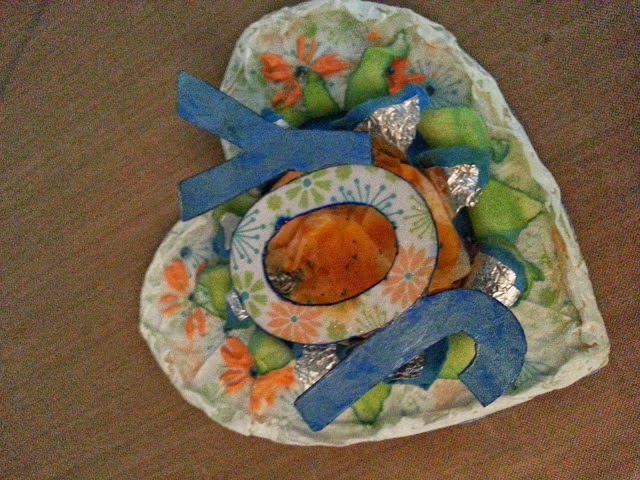
Finally, the last heart was made using the same template with an additional 2 layers.  The first layer was the card board heart.  The second was a layer of aluminum foil.  The third was a layer of scrapbook paper.  I carefully cut through top 2 layers and folded them back.  That's where the fun started.  I painted, stamped, inked...  When I was done, it still looked a little plain so I added a wrapped edge of tissue paper then coated the whole edge thing with one more coat of white paint.  The word is made of chipboard letters covered with paper and edged with blue ink.  Finally, it was all attached together with handmade springs.  I made the springs using thick jewelry wire.  
 

Friday, July 19, 2013

Watercolor ATCs

These are a few examples of watercolor ATCs I've completed.


Oregon Coast
Autumn Leaves
Inspired by a painting I saw in a gallery...

Collage using magazine scraps


I recycle several magazines each month.  One of the ATC swaps I signed up for was using magazine scraps to make cards.  These are a few examples of the results.


I am an artist

I read an article a few months ago by an artist who recently published a book.  She said that when she first heard herself say that she was an artist it felt weird.  She said that in the past she might have said she did art or she might say she was an artist but then she would feel like she had to explain or to justify herself.  But one day someone asked her what she did and she said, "I am an artist."  Then she stopped talking.  She just let it hang in the air.

This got me thinking.  I love to do art but I had never actually said that I was an artist.  Artists draw or paint wonderful pictures.  They create beautiful things that people want to look at or even buy.  I didn't sell things or have people even ask that I give them things I made.  Heck, I think my own family even tossed the birthday cards that I so lovingly made for them.  I couldn't be an artist.  If I said that I was an artist, it opened me up to criticism and ridicule. People would expect masterpieces or at least something worthy of hanging on the wall. 

But then I thought...what if I am?  I am a scrapbooker and card maker.  I make pretty pages and cards from paper.  I use rubber stamps and markers.  I've even painted a background using acrylics.  I collage and make origami.  What if the things I create, whether anyone would buy them or not, whether or not anyone would proudly display them, just what if those things are art??  Could it be that I am an artist and just didn't know it?

So I decided to try it on for size.  I went to the bookstore and bought a book about art journals and another on mixed media.  I searched online for art tutorials.  I took an online class from a mixed media artist.  I did art.  I still kept comparing it to all those other people and knew that I did art but the words wouldn't come out of my mouth.  I couldn't say that I was an artist.  It just didn't fit.

Then, just by accident, I found a wonderful online community of artists that said they didn't judge.  They didn't compare.  The goal was to do your best work and then to be brave enough to give it to other people.  The only thing that almost made me not join them was that someone wrote in a post that they didn't want any art submitted that was too "scrapbooky."  That was where I came from.  It was my creative product.  But, I decided it was time to jump in or forget it.  I wanted to be an artist.  I wanted to create beautiful things.  So I joined and began creating art. 

Here we sit a little over 4 months later and I love to do art.  Am I an artist?  Yes, perhaps I am.  I wrote it on paper.  I wrote it in the title of this blog post.  I even started working on a mixed media hand that clearly states that "I am an artist."  Do I believe it?  Maybe.  Am I getting used to the idea? Definitely.  Like the artist in the article I read, I am going to say it and let it hang out there.  When she said it, it hung for a few seconds then the conversation continued with the people around her being curious abut her art.  They didn't doubt that she was an artist.  They didn't judge her for saying she was an artist.  They didn't ask if she was famous or if she sold masterpieces.  They were just interested.  She said that she is an artist and she believed it about herself.  She even published a book about creating art but she would be an artist even if she hadn't.

Because I believe you get better at the things you practice, my goal has been to create something everyday.  A whole lot of creating and learning has happened since that fateful day 4 months ago.  Is my art all good?  No, that I can honestly say, but much of it is quite nice.  With that long, drawn out introduction to my artistic endeavors, I bring you my art.  I promise not to share all of it but I will share some of it. 

I am an artist.  Thanks for taking a look.